Large-format digital printing file management is a slightly complicated process. It’s not enough to have access to the special computer applications that are necessary for preparing artwork files, you need to know how to use them. We always get asked what kind of files we prefer, and the answer is almost always a .PDF file. However, here are some important printer marks to include within your final large-format digital artwork.

What are Printer Marks for a Full bleed Print?
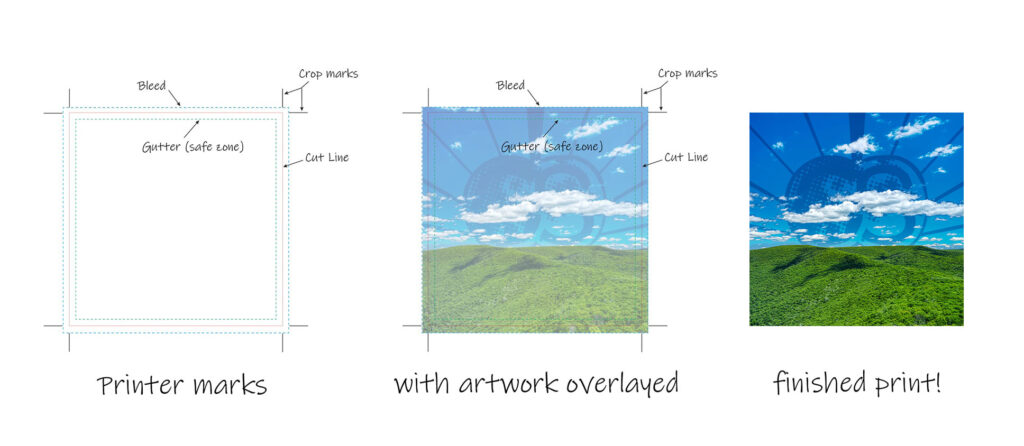
Firstly, Printer marks allow for a variety of things to happen including alignment for proofing, color calibration, and for the prints to be trimmed to size. They are necessary for printed graphics intended to have the design reach the edge of the item being printed on. In the printing industry, that is referred to as full bleed. For the type of printing that Connecting Signs specializes in (signs, wraps, and graphics), most printed graphics that we produce are full bleed. The marks required for this type of artwork file include crop marks (where the print will be cut), a bleed, a gutter (or safe zone).

How to set up a full bleed .PDF File for Printing
Printer marks include a gutter (or safe zone), crop marks, and a bleed. The marks allow the graphics to be finished properly – cut at the end of the print so the image “bleeds” off the graphic. Setting up printer marks in a computer program like Adobe Illustrator are done easily when you set up the file. There is also a way to do it directly to the .PDF file from Adobe Acrobat Pro. Here’s the steps to set up a full bleed print file in Adobe Acrobat Pro.
- Embed printer marks by choosing Tools > Print Production > Add Printer Marks
- Specify the pages you want to mark
- Specify the marks and settings
- Set Page Boxes Dialog Box Overview – This dialog box allows you to set boundaries for the crop marks, bleed, art, and page size
- Open the Set Page Boxes dialog box
- Tools > Print Production > Set Page Boxes
- Fix Hairlines – also referred to as crop marks
- Tools > Print Production > Fix Hairlines
- Type a width for the hairline you want to find, and a replacement width
- Select unit of measurement
- Specify the pages
What to expect with Large-format printing?
Sending print-ready artwork is something that you want to do once. Large-format prints are costly to have to reprint repeatedly. Sometimes your prints will need to be set up in a custom way so the steps mentioned above will not be completely accurate to accommodate for your prints. If you’ve hired a company to prepare your final artwork for printing, communicate the ways in which you want your final product to look. Here at Connecting Signs, we are the large-format printing experts! Contact us today to get your signs, wraps, and graphics printed up so you can get back to business.
